Policy engine
Rules by package name, version range, age, source, license and custom criteria. Block or log-only, with time-limited exceptions. Re-evaluated on every request.
npm is the most targeted package ecosystem in the world. Typosquats, account takeovers and malicious maintainer commits have injected malware into packages with millions of weekly downloads. The npm Dependency Firewall blocks them before your developers or pipelines ever see them.
Bytesafe Dependency Firewall sits in front of your existing repository, protecting developers, CI/CD pipelines and AI agents.
EU-based company · Software supply chain security since 2018.
A selection of documented supply chain attacks on npm. The npm ecosystem has been targeted by malicious packages, account takeovers, and dependency confusion attacks.
Malicious packages impersonate axios and other high-traffic libraries using one-letter name differences: axois, axious, axxios. They are published continuously and contain credential-stealing payloads. Blocked by malware signature matching.
Malicious packagesMalicious packages impersonating @tanstack/react-query and related packages were published to npm. The attack targeted the same publication-to-detection window as shai-hulud. A safety delay would have held the versions before any developer could install them.
MalwareA family of malicious npm packages (shai-hulud, shai-hulud-v2, shai-hulud-mini) published to exploit the window between publication and detection. Bytesafe's zero-day safety delay holds newly published versions for a configurable window before they reach developers.
MalwareThe maintainer deliberately published a version that detected Ukrainian or Russian IP addresses and overwrote files on disk. The package was a transitive dependency of the popular vue-cli toolchain.
Maintainer sabotageThe maintainer published versions that caused applications to print infinite ANSI sequences and nonsense strings to stdout. Thousands of applications broke on upgrade without any warning.
Maintainer sabotageAttackers register public npm packages with the same name as internal packages. npm resolves the public version by default. The firewall ensures internal packages always win.
Namespace attackAn attacker gained access to the maintainer's npm account and published three malicious versions. The injected payload installed a cryptominer and a credential-stealing trojan. Over 8 million weekly downloads at the time.
Account takeoverA maintainer transferred ownership to an unknown account. The new maintainer injected code that stole Bitcoin wallet keys from a specific Copay application. The package had 2 million weekly downloads.
Maintainer handoffThe maintainer's npm token was stolen via a compromised package. The attacker published a new version that exfiltrated the npm credentials of anyone who ran npm install.
Account takeoverDependency Firewall does not prevent all attacks, but blocks packages that match known malware signatures, fail provenance checks, or violate your policies.
Every package install is a potential entry point. Traditional SCA tools find problems after packages are already in your environment. Dependency Firewall intercepts every npm request before it reaches your developers, CI/CD pipelines or AI agents.
You define the rules: block packages with known CVEs, block known malicious packages, or delay newly published versions for a configurable period to give the ecosystem community time to surface zero-day threats.
Works in front of enterprise repository platforms and any npm registry. No agent installs. No workflow changes.
Public npm registry
Vulnerable and malicious versions included
Dependency Firewall
Policy engineDevelopers and CI/CD
Internal environment
Policy controls, malware blocking, package delay, provenance checks, publish scanning, and full audit visibility across every npm request.
Rules by package name, version range, age, source, license and custom criteria. Block or log-only, with time-limited exceptions. Re-evaluated on every request.
Block packages with known CVEs before install. Filter by CVSS and EPSS severity per registry or team. New advisories take effect immediately.
Detect malicious payloads, suspicious install hooks and obfuscated code before execution. Quarantined packages are logged and never silently dropped.
Verify packages were built by expected publishers using Sigstore and SLSA attestations. Detect pipeline swaps and version downgrades early.
Block namespace attacks where public packages impersonate your internal ones. Configurable upstream priority rules ensure private packages always win.
Hold newly published versions for a configurable window (7 or 14 days) before they reach developers or pipelines. Gives the ecosystem time to surface threats.
Every package is fingerprinted: first-seen date, download frequency, requester, version age. Know exactly what passed through and when.
Every block, allow and exception is recorded and exportable to your SIEM. Built to make security teams and auditors happy out of the box.
Packages are scanned for malware, secrets, and sensitive data before they are published to an upstream registry.
Route npm package traffic through Dependency Firewall, define policies for what's allowed and let the firewall block the rest. Developers and pipelines keep their existing package manager commands.
01
Point your npm configuration at Dependency Firewall. Every install request passes through the firewall before reaching the registry or your environment.
02
Set vulnerability thresholds, enable malware scanning, configure safety delays for new versions and write allowlist or blocklist rules. Create multiple firewalls with individual rules for different teams or projects.
03
Every request is evaluated in real time. Blocked packages are logged with the policy that triggered them. Approved packages are served transparently.
Point npm, yarn, pnpm or Bun at your Bytesafe Dependency Firewall endpoint. Existing package manager commands and lock files continue to work without changes.
Works with the repositories you already use
Each rule targets an ecosystem and applies a condition: vulnerability severity, package age, license type or name pattern. Rules either block or log. Stack multiple rules per firewall. Changes take effect immediately.
Security teams can start with broad guardrails, then narrow policies by upstream, package, version range, internal status, maximum age, CVSS score and EPSS score.
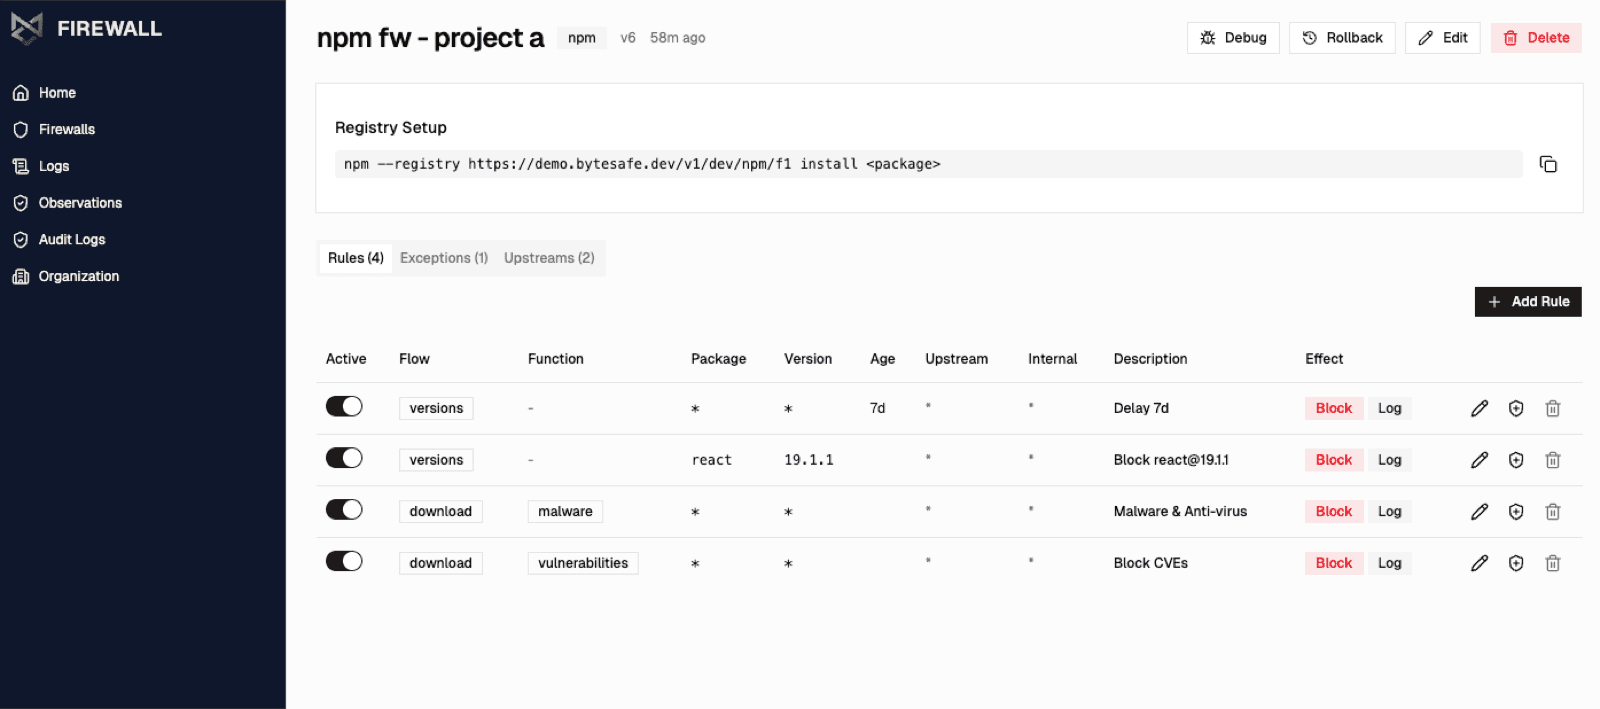
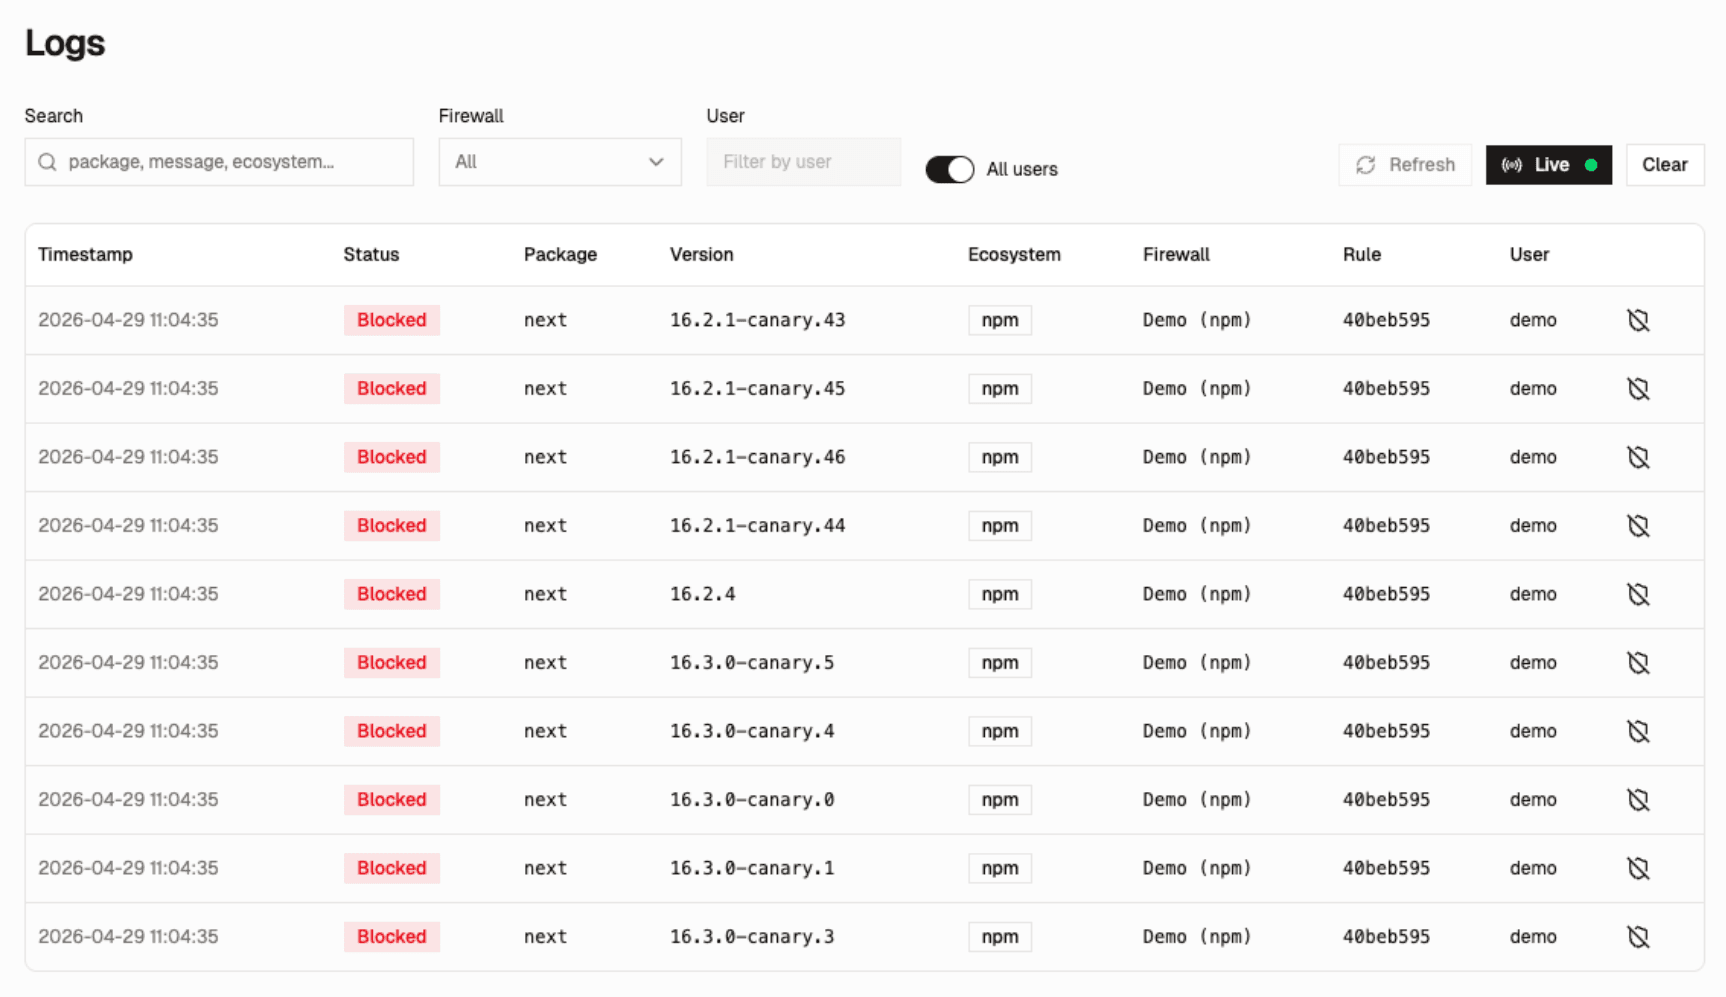
Every blocked package is logged: package name, version, status, ecosystem, which firewall evaluated it, which rule triggered and who requested it. Filter by firewall or user.
The log view gives developers a fast answer when an install fails and gives AppSec a complete audit trail for policy enforcement.
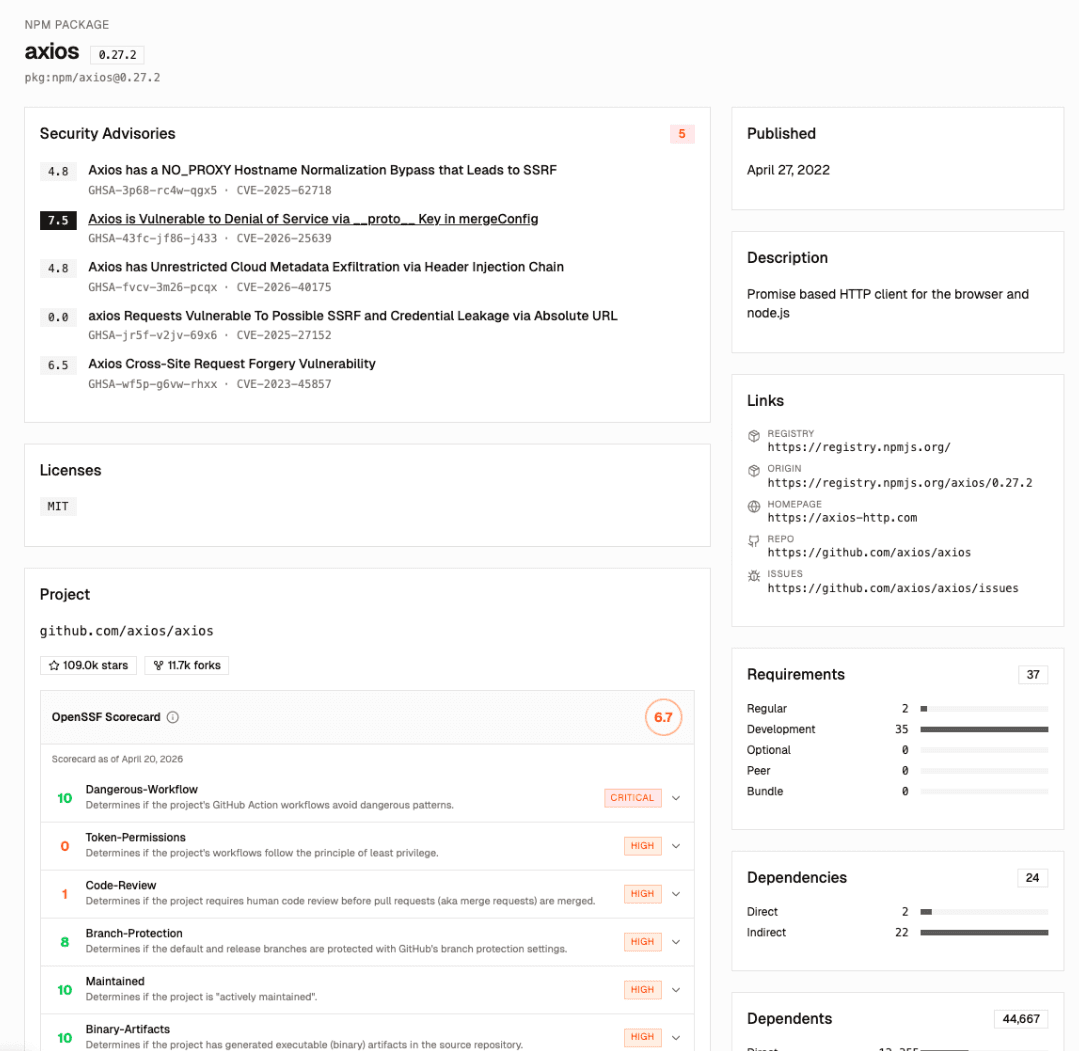
Open a package to review advisories, licenses, project metadata, OpenSSF Scorecard checks, dependency counts and source links before deciding whether to block, allow or investigate further.
The package page brings runtime firewall context together with upstream project health. Security teams can compare CVEs, maintainer signals, and repository hygiene from the same screen.
Other enterprise dependency firewalls are often bundled into repository platforms. Dependency Firewall is an independent firewall that works with any registry and is built in the EU.
| Criterion | Dependency Firewall | Other enterprise firewalls |
|---|---|---|
| Works with your existing repository | Yes, as a proxy in front of it | Bundled into their platform most often |
| Deploys in minutes | Yes | Usually weeks of platform work most often |
| Predictable pricing | Flat, no usage-based fees | Usage-based or opaque most often |
| EU data sovereignty | Yes | No, US-based most often |
Common questions from security and engineering teams.
Book a 30-minute session and we'll show you how Dependency Firewall fits into your existing setup. Your registries stay unchanged.
